D.I.Y: How to take your forks off
How to get your USD forks out and, if you’re up for a challenge, strip ’em down to meddle with your oil level


Follow our 10 step guide to getting your forks off
There are many reasons why you may want to remove your forks. If a seal has blown you can save on labour charges by dropping them into your dealer. You may need to check the forks are straight or send them off to be straightened after a spill. Or you may want to change the oil and adjust the air gap. Whatever the reason, removing forks isn't that hard.
What's trickier is stripping modern cartridge-type forks to change the oil and/or oil level. So there are two parts to this DIY tip: taking your forks out, then stripping them.
First, get the bike on a decent set of paddock stands. The abba Superbike stand works best for us, supporting the bike at the swingarm pivot.
With the bike supported you will need to unbolt the front brake calipers, pull them clear of the discs and unclip their hoses from the mudguard. It's a good idea to support the calipers using a cable tie or piece of wire so as not to stress the hoses. Next, remove the front wheel, which we've covered in the past, then the front mudguard. Usually there are two fixings either side to hold the guard in place. It may be necessary to twist the fork legs round while squeezing the guard to avoid scratching the paint.
Before you undo the yoke pinch bolts it's a good idea to measure the front fork drop - the distance from the top of the fork tube to the top face of the top yoke. Using a vernier gauge or metal ruler make a note of the measurement so the forks can be refitted in exactly the same position. Next, loosen the top yoke pinch bolt and handlebar pinch bolt. If you're stripping the forks yourself, now's the time to loosen the fork cap - it's easier to do it at this point than later on. With the tops loose you can then undo the bottom yoke pinch bolts and gently slide the fork out.
Refitting is simply a reversal of removal. Slide each fork up through the bottom yoke, then the handlebar and finally up through the top yoke, making sure all cables and wiring are properly routed. Set the fork drop to the correct height using the measurements you took earlier, and nip up the bottom yoke pinch bolts. Re-check the fork drop before tightening the bottom yoke bolts to the recommended torque setting. Repeat this for the other fork assembly. With the caps and lower pinch bolts tight you can now tighten the top yoke and handlebars. Fit the mudguard, wheel and brake calipers, tightening everything to the manufacturer's torque settings. Finally, pump the front brake lever a few times to push the brake pads onto the discs. Job done.
Stripping them
There are two main types of fork assemblies: damper rod and cartridge. The cartridge type we're looking at here can be 'upside down' or 'right
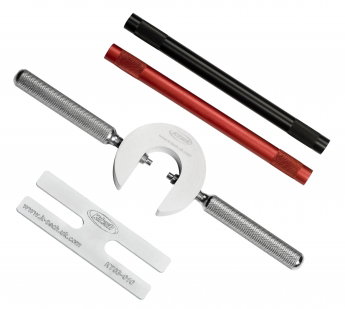
way up', but the principles for stripping either are the same. Please bear in mind that this isn't an easy five-minute job, and if you're not sure what you're doing you should leave it to an expert (and it's a two-man job). Stripping a set of fully adjustable, upside-down cartridge forks - these belong to our GSX-R1000K5 longtermer - enough to change the oil or adjust the air gap will require a few specialist tools. We got a kit from K-Tech, the suspension people (see 'Special Needs', left).
Before you undo anything, make a note of all the damping and preload settings. You will then need to undo the large hex nut at the top of the fork assembly - the fork cap, which should have been loosened earlier. Be sure to cover the complete cap with one hand and apply some pressure because it can strip the last few threads as the spring forces the cap off.
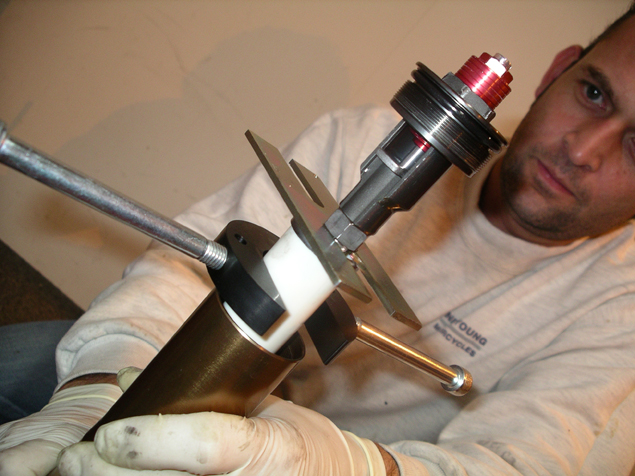
With the cap undone, draw the cap and spring assembly out further, at which point the C-shaped tool can be clamped in place as shown in the photos. Removing the fork spring is a two-man job, one to compress the fork spring by pushing down on the special tool's handles, the other to pull the cap and adjuster up as far as it will go to slide the H-shaped retaining plate under the lock nut (see main pic, left). Once the plate is in place the fork cap can be held with a spanner before backing off the lock nut.
With the lock nut backed off, the fork top can be removed. Again, grab a helper to compress the fork spring while you remove the lock nut completely, and slowly release the fork compression tool until it can be removed with the top spacer. Next, slowly draw out the spring, turning it as if you're removing a bolt, to allow the oil to drain back into the fork assembly - fork air gaps are measured in millimetres, so every drop counts, and whether you're changing the fork oil or adjusting the air gap you should measure and make a note of the current gap. There are special tools available to carry out the air gap measurement, but we made one using a carpenter's combination square, a large syringe and a length of tube. The combination square also incorporates a mini spirit level to help make sure the fork is upright for an accurate reading.
With the fork upright and fully compressed, measure the air gap from the top of the fork leg to the top of the oil level, then pour out the old fork oil. Pump the fork to drain out as much as you can and leave it inverted over the drain tray while you work on the other fork to allow every last drop out.
Once the fork is drained, refill with oil - most manufacturers give an oil capacity in ccs and an air gap in millimetres. Compress the fork as far as it will go before filling with the recommended amount of oil, then bleed all the remaining air from the cartridge by screwing in the special damper-rod tool and pumping the rod up and down until the unit moves smoothly and you can feel resistance. You should be able to hear when there's no more air in the system.
Now make your final adjustment to the air gap. This will be more accurate than filling each fork with a measured amount of oil and will guarantee both forks' capacities are identical. The GSX-R's forks came with a 106mm air gap, which we reduced to 95mm in each leg. With the level correct you can refit the spring, again getting your assistant to compress the spring with the C-shaped tool while you screw the lock nut on as far as it will go before sliding in the H-shaped plate.
With the plate in place, refit the fork top. At this point you will need to preset the rebound adjuster. This procedure may vary from bike to bike so check with a dealer or helpful fork expert. In this case we turned the rebound adjuster fully in until it sat in the final click position. With the rebound set you can fit the fork cap onto the damper rod by turning it until it just stops.
Once in place, tighten the lock nut, making sure the position of the fork cap in relation to the fork leg does not change (this ensures both legs are identical, and both minimum and maximum preload and rebound adjustments are available). With everything locked in place, check you have a full range of adjustment on the rebound adjuster. If not, you will need to back off the lock nut and then back the cap off slightly before trying again. Once you are satisfied, screw the cap into the fork tube and refit the forks into the bike following the reinstallation instructions above.

Sponsored By

Britain's No.1 Specialist Tools and Machinery Superstores
When it comes to buying tools and machinery, you need to know you're buying from specialists who know what they're talking about.
Machine Mart eat, sleep and breathe tools and machinery, and are constantly updating their range to give you the very best choice and value for money - all backed by expert advice from their friendly and knowledgeable staff. With superstores nationwide, a dedicated mail order department and a 24 hour website offering quality branded items at fiercely competitive prices, they should be your first choice for quality tools and equipment.


