
FOR many motorcyclists in the UK and beyond, the ongoing COVID-19 pandemic is meaning we all have quite a lot of free time right now... and the devil makes for idle hands!
The truth is though, there are only so many jobs you can carry out on your bike in situations like this. So instead of simply ceasing to put energy into your passion, change your focus and give your riding kit a quick once over.
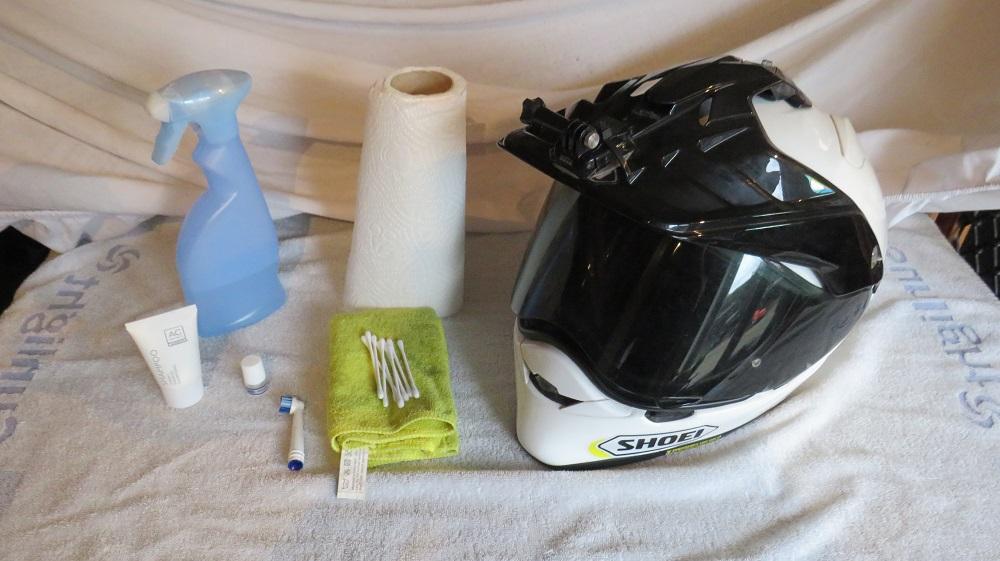
What tools do I need to clean a motorcycle helmet?
First off, clean a decent space on your kitchen worktop and make sure your hands are clean too. Lay out a towel, it helps protect the lid and if you drop any tiny stews or fixings they are easier to spot! If you can, get hold of a helmet cleaning kit like the MOTUL Helmet Care pack or similar. They have all the correct detergents ready to go for you but don’t fear if you don’t have one or can’t get hold of one. You’ll likely have all you need around the house.

Motorcycle helmet cleaning checklist
- Toothbrush/soft nailbrush
- Baby shampoo
- Soft kitchen sponge
- Lint-free cloths
- Cotton buds
- Kitchen roll
- Large bucket (or you can use a clean sink or your bath)
- Empty spray bottle
- some various sized screwdrivers - if you wish to fully strip the lid

Step one – strip and wash the lining of the helmet
Before you start cleaning the helmet down, try and get the lining stripped out of the lid as much as possible. Most now come with fully or partially removable interior liners that require a steady hand to remove. Be careful not to damage the liner or the inside of the shell when removing it and if it helps, take some pictures of the inside of the lid to show you how it goes together.

Once the lining is removed from the lid, fill the bucket or the sink with warm but not hot water and add about 10 to 15ml of the baby shampoo. Pop your removed parts of the interior into the water and give it a swirl around in the soapy water. Leave it there and turn your attention back to the helmet.
- Note – If your helmet lining is not fully removable, don’t worry, the baby shampoo and warm water won’t damage your lid. Fill the bath or sink with about six to eight inches of warm water and add a couple of capfuls of shampoo. Place your lid in and give it a swoosh around to get all of the non-removable internal parts soaked. Go around the lining with your hands and gently massage the interior until the entire lining is soaked through.

Step two – remove the exterior fixings
For a properly thorough clean you can go as far as removing things like vents, catches and hinges and cleaning behind them. This will make your lid showroom clean, although removing some of the fixings and especially vents can be tricky, and some elements are held in place with small, fragile catches that are easily snapped. Also, NEVER be tempted to try and lever the vents off with a kitchen knife, you’ll almost certainly scratch the shell and probably damage it and the vents!

If you’re up for the challenge, then go for it but take your time. Most helmet manufacturers have videos on YouTube that take you through vent and hinge removal. It’d be best to watch one as you go along. If the total strip down is a bit much for you, skip this part and go straight to step three.

Step three – clean the shell
While the lining is still in the soak, it’s time to get the exterior of the helmet clean. Bug splats, road grime, and diesel fumes all leave residue, marks, and stains on the exterior shell of your helmet. It can be tempting to just scrub the shit out of your lid with a sponge or scourer but doing so will almost certainly damage the finish.

To protect the outer shell, fill the empty spray bottle (if it’s been used for cleaning products make sure it is thoroughly rinsed out before use) with warm water and a few drops of baby shampoo. Spray the entire outer of the helmet and then lay kitchen roll over the lid, covering it totally. Once it’s fully covered with kitchen roll, give it another spray with the soapy water and press the paper against the outer shell.

Leave the helmet like this for about five minutes and while you’re waiting, give the lining that is soaking in the bucket another swirl around. You should see the water in the bucket start to change color as it pulls the dead skin cells and grime out of the foam lining and into the water. Bit grim, isn’t it!?

Once all the bugs and grime on the lid have been soaked by the wet kitchen roll, they will come off the surface of the helmet really easily. Once you’ve got the exterior cleaned, give it a dry with a soft lint-free cloth.
Step four – get into the crack and crevices
Now the exterior of the helmet should look pretty clean, but there is still like to be small amounts of dirt and grime in the hinge mechanisms of the lid. Whether you’ve removed the exterior elements (vents etc) of the lid or not, it’s time to clean the less easily seem areas of the lid.

The visor hinge mechanism is likely to be a place that can collect dirt and road grime. Take the toothbrush or soft nail brush and soak it in soapy water. Now work the bristles of the brush into all the nooks and crannies, rinsing the area thoroughly when done.
Step five – clean your visor
There is no point in applying all this care to your lid and not your visor. Treat it the same way as you do your shell. Soak it to soften the grime and bugs and then wipe it off gently with a soft lint-free cloth. Make sure you remove your Pinlock before washing, immersing it in water could inhibit its ability to prevent misting up.
Instead, very gently wipe the Pinlock with the water and mild shampoo mixture and the lint-free cloth. Allow the Pinlock and the visor to dry out naturally and never apply heat to them or leave them on the radiator.

Step six – let it all dry out
It can be tempting at this point to try and speed up the drying process with either a hairdryer or a radiator. I’ve even heard of people placing the interior in a helmet sack and dropping it in the tumble dryer!
All three of these should be avoided! Don’t rush it and leave the interior lining of the lid to dry naturally. Placing them in front of a radiator is fine, the upwards air current will help speed up the drying process. Placing the parts on top of the radiator could damage the foam lining and cause it to lose its shape.

Step seven – reassemble the lid
The final step is to get your helmet back to the state that it can be worn again. Only complete this step when the helmet’s interior lining is totally dry. If needed, refer to the pictures you took at the start of the process for a clue as to where it all fits.
Before fitting the lining, refit any of the external vents and hinges to the lid, leaving the visor off for now. It’ll make it easier to refit the interior with the visor removed.
Once the lining is in, pop the lid on and make sure that the chin strap is in place and working and that none of the internal elements are out of place.

Step eight – lube up the hinges and visor seal
Most lids come with a small bottle of silicone grease included in the box, it helps the visor mech and hinges work smoothly and can help prevent wear through use. Washing your lid will remove any or all of the lube that’s applied in the manufacturing process so it’s imperative you replace it.

You don’t need much but a few drops on the moving parts of the lid will help no end. Also, drop some on your finger and run it around the rubber visor seal, wiping off any excess if needed. The silicone grease will help the visor to seal out water and wind and also helps to prevent the rubber from drying out and cracking.

Step nine – refit the visor, have a cup of tea and wait for all of this to blow over!
The final step is to refit the visor to the lid. Before you do this, put the Pinlock back in place in the visor, a set of silicone disposable gloves will help you re-install the Pinlock without getting annoying fingerprints on the inside of it.
Now sit back and bask in the glory of your newly cleaned and fresh smelling lid.